How to Sew a Stuffed Animal at a professional, large-scale manufacturing level is completely different from a personal craft project. Ever wondered how a plush toy goes from a 2D sketch to a 3D product on a retail shelf? This guide moves beyond the hobbyist’s sewing table to give you a manufacturer’s perspective. As specialists from a plush toy factory, we’ll walk you through the industrial workflow—the same process used to create thousands of units for global brands.
In this article, we explain how to sew a stuffed animal with the level of engineering and precision required in real production. We cover the critical details behind material selection, pattern drafting, internal structure design, filling techniques, and factory-level quality control. These are the components that determine the softness, durability, and safety compliance of each plush toy.
This is not a simple tutorial; it’s a blueprint for understanding how to sew a stuffed animal at scale. We’ll break down technical specifications, cost considerations, production timelines, and the mandatory safety standards that govern the plush toy industry. For brands, designers, and B2B buyers, mastering this knowledge is essential for smoother supplier communication, more accurate quotations, and successful product development.
1. The Manufacturing Process: From Concept to Container
Understanding How to Sew a Stuffed Animal at scale begins with recognizing that the journey from a digital design file to a shipping container of finished plush toys follows a highly structured, multi-stage workflow. In professional manufacturing, how to sew a stuffed animal is not just about stitching—it’s about coordinating engineering, pattern development, material control, and mass-production standards.
Each stage becomes a critical control point designed to ensure consistency, safety, and quality across thousands of units. By mastering how to sew a stuffed animal from a factory perspective, brands and designers gain clearer expectations and smoother collaboration throughout the entire production cycle.
Phase 1: Prototyping and Sampling
This is the foundational stage where your design is translated into a physical product.
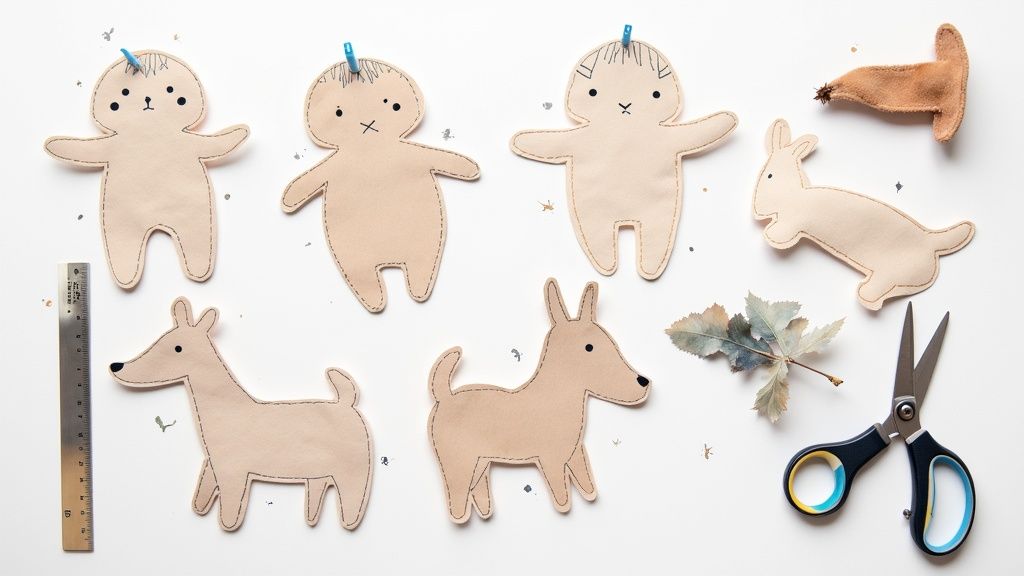
- Pattern Making: Our technicians convert your 2D design into a 3D digital pattern using CAD software. This pattern is meticulously engineered to account for fabric type, seam allowances (typically 3-5mm), and construction complexity.
- Material Sourcing: We procure fabric swatches (e.g., Minky, Velboa, Sherpa fleece) and filling materials (e.g., 7D PP cotton) based on your specifications.
- First Sample Creation: A physical prototype is created. This initial sample is for assessing shape, construction, and overall feel. The typical timeline for a first sample is 7-10 days.
- Revisions & “Golden Sample”: Based on your feedback, we refine the sample. This iterative process continues until you approve the final “golden sample,” which becomes the quality standard for the entire mass production run.
Phase 2: Mass Production Workflow
Once the golden sample is approved, production begins at scale.
- Material Cutting: Large bolts of fabric are laid out in stacks and cut using industrial laser cutters or die-press machines, ensuring every piece is identical to the CAD pattern.
- Embroidery & Printing: Details like eyes, logos, or patterns are applied to the flat fabric pieces using computer-controlled embroidery or printing machines for perfect consistency.
- Sewing Assembly: Cut pieces are distributed to sewing lines. Operators use industrial lockstitch machines to assemble the toy’s “skin,” leaving a small, strategic opening for stuffing. This is the core of how to sew a stuffed animal efficiently.
- Stuffing: The sewn skins are filled using high-pressure air-blowing machines that inject a precise weight of PP cotton. This ensures uniform density across all units.
- Closing & Finishing: The stuffing opening is hand-sewn shut using an invisible ladder stitch. Workers then perform final shaping, brushing (for long-pile fabrics), and steam-ironing to remove wrinkles.
2. Pricing Factors: What Determines Your Cost?
Understanding the cost structure is crucial for B2B buyers. The final price per unit is not arbitrary; it’s a calculation based on several key factors.
Material and Filling Costs
- Fabric Type: Standard materials like Velboa are cost-effective. Premium fabrics such as custom-printed Minky, organic cotton, or two-tone long-pile faux fur significantly increase costs.
- Filling: The standard is 7D or 15D polyester fiberfill (PP cotton). Special requests like recycled PP cotton, foam beads, or internal plastic skeletons (armatures) for poseability will raise the price.
Complexity and Labor
- Stitch Count: A simple design with few pattern pieces requires less sewing time than a complex character with many small parts, gussets, and intricate details.
- Embellishments: The number, size, and stitch density of embroidered areas directly impact machine time and cost. Appliqué, airbrushing, or sublimation printing also add to the unit price.
B2B Insights for Cost Reduction:
- Design for Manufacturability (DFM): Simplify curves and reduce the number of small, separate pattern pieces. For example, embroidering a detail is often cheaper than sewing on a separate small fabric piece.
- Material Choice: Opt for standard, readily available fabrics and fillings unless a premium material is a core feature of your product.
- Increase Order Quantity: Larger orders reduce the per-unit cost due to economies of scale in material purchasing and production setup.
3. MOQ (Minimum Order Quantity): A Factory Necessity
MOQ is the minimum number of units a factory will produce in a single run. It’s not an arbitrary number; it’s determined by the economics of mass production.
- Typical MOQ Range: For most custom plush toy designs, MOQs start between 500 and 1,000 units per design/colorway.
- Why MOQs Exist: Factories purchase raw materials like fabric in large rolls (hundreds of meters). The setup costs for cutting dies, embroidery files, and production lines are significant. MOQs ensure that the production run is profitable enough to cover these fixed costs.
- Low MOQ Challenges: Factories offering very low MOQs (e.g., 100-200 units) are often trading companies or small workshops, which may lead to higher unit costs and potential inconsistencies in quality.
4. Quality Control and Safety Standards
A professional manufacturer integrates quality control throughout the entire production process. This is not a single check at the end but a series of checkpoints to prevent defects.
Key Inspection Steps:
- Incoming Material Inspection: Raw materials are checked for color consistency, defects, and correct specifications before they enter the production line.
- In-Process Quality Control (IPQC): Supervisors monitor the sewing and assembly lines to catch errors (e.g., crooked seams, incorrect embroidery placement) as they happen.
- Stuffing & Metal Detection: After stuffing, every single toy passes through a metal detector to ensure no broken needle fragments are inside—a critical safety step.
- Final Quality Control (FQC): A dedicated team inspects each finished unit for aesthetic defects, seam strength (pull tests), and adherence to the “golden sample.” This includes checking for loose threads, proper stuffing density, and symmetry.
Mandatory Safety Standards:
Compliance is non-negotiable. Reputable factories design and manufacture products to meet international toy safety standards.
- EN71 (Europe): This standard covers mechanical and physical properties, flammability, and chemical composition.
- ASTM F963 (USA): This is the mandatory safety specification for toys in the United States, covering hazards like sharp points, small parts (choking hazards), and lead content.
- Certifications: Always ask a potential supplier for their BSCI or ICTI audit reports and proof of product testing from accredited labs like SGS or Intertek. The risk of working with a non-compliant factory includes product recalls, legal liability, and irreparable brand damage.
5. Logistics: From Factory Floor to Your Warehouse
Once production is complete, the final phase is getting the products to you.
- Packaging: Each plush toy is typically packed in an individual polybag, then placed into master cartons. We calculate carton dimensions to optimize container space and reduce shipping costs.
- Shipping Terms (Incoterms): Common terms include FOB (Free On Board), where the buyer assumes responsibility once the goods are loaded onto the vessel at the port of origin, and DDP (Delivered Duty Paid), where the factory handles shipping and customs clearance to your final destination.
- Lead Time: Standard mass production lead time is typically 30-45 days after the golden sample is approved, plus shipping time (e.g., 30-40 days by sea to the US or Europe).
6. How to Choose a Supplier
Selecting the right manufacturing partner is the most critical decision for your brand.
Key Differentiators:
- OEM vs. ODM: OEM (Original Equipment Manufacturer) is when you provide a complete design, and the factory produces it for you. ODM (Original Design Manufacturer) is when you select and customize a pre-existing design from the factory’s catalog. True factories excel at OEM.
- Factory vs. Trading Company: A direct factory has its own production lines, offering better cost control, transparency, and quality oversight. A trading company is a middleman that outsources production, adding a margin and another layer of communication. Ask for a factory audit report (like BSCI) or conduct a video tour to verify.
- Common Buyer Problems: The most frequent issues stem from poor communication, resulting in samples that don’t match the design, unexpected production delays, and inconsistent quality in the final batch. A responsive, English-speaking sales and engineering team is essential.
Explore our library of market-tested patterns to see how precise engineering leads to superior products. Learn more about our successful stuffed animal designs.
7. Why FunEnjoy is a Trusted Manufacturer
How to Sew a Stuffed Animal from a manufacturing perspective is the foundation of a successful product launch. Understanding how to sew a stuffed animal at scale allows for clear communication with your supplier, realistic expectations, and a final product that is safe, high-quality, and aligned with your brand’s vision.
At FunEnjoy, we don’t just show you how to sew a stuffed animal—we execute the entire production process as a dedicated plush toy factory, not a trading company. With a proven track record of supporting global brands, our workflow is built on transparency, engineering expertise, and strict safety and quality standards. This ensures every plush toy moves from concept to mass production with precision and consistency.
- Direct Factory Advantage: We offer competitive pricing, direct communication with our engineering team, and complete control over the production process.
- Expertise in Compliance: We are experts in EN71 and ASTM F963 standards, ensuring your product is market-ready for Europe and North America.
- OEM/ODM Capabilities: Whether you have a finished design or just an idea, our team can guide you from concept to mass production.
Discover how our blended manufacturing techniques create superior plush toys. Contact us to discuss your project’s specific production needs. Or, to see how we integrate these steps into our manufacturing workflow, explore our in-depth production process.